Hello! Today we will talk about JRootPane and how to use it.
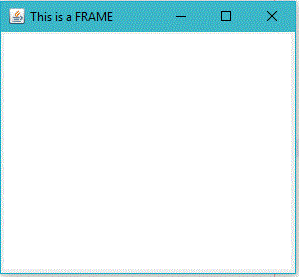
When you look at any window in a computer, the outer part containing the minimize, restore and close buttons and the overall border can be thought of as a frame. The frame that we are imaging is still hollow! That means there is nothing in the middle. So, the frame is similar to a real-life photo frame.

When we create a JFrame object, a JRootPane is automatically created and it occupies the empty part of the frame. So, the JRootPane is like the base of the photo frame. This means that all the content in the frame should lie on top of it.
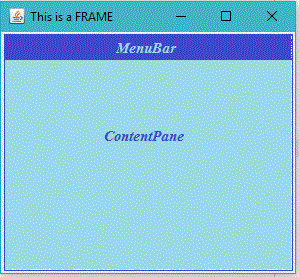
Now the JRootPane has two children. There is an optional MenuBar and a ContentPane.
The menu bar occupies the upper part while the rest of the part is used by the ContentPane.

As the name suggests, all the contents that we might add will be placed on the ContentPane.
Hence, the ContentPane is very similar to the photograph in the photo frame. It holds the visible content. Whenever we add a component to a JFrame using a method like frame.add(component),
the ContentPane is implicitly called and the component is added to it. As the ContentPane has no default layout, the component takes up the entire area of the component pane. In case we add a new component, the old component is overlapped by the new one.
Finally, we have the GlassPane. It covers the entire visible area of the root pane. It behaves just like a sheet of glass and is completely transparent unless we implement the glass pane’s paintComponent method. The glass pane can also perform complex tasks like intercepting the mouse pointer etc.
It is similar to the glass on the photo frame which is invisible and lies on top of the photograph.
We can summarize this discussion as follows. The JFrame object has a RootPane at its middle. This root pane acts as a base for the MenuBar and the ContentPane. All the content is placed on this content pane. Finally, a transparent GlassPane covers the entire visible area of the RootPane.
This entire structure is similar to a real-life photo frame with a photograph in it.
The following program show us how to access and use these underlying panes.
————————————————————————–
import java.awt.*;
import javax.swing.*;

public class RPane extends JFrame{
        public static void main(String[] args) {

//Creating a frame
        JFrame frame = new JFrame("This is a Frame");
        frame.setLayout(new FlowLayout());
        frame.setSize(279,200);
        frame.setLocationRelativeTo(null);
        frame.setDefaultCloseOperation(JFrame.EXIT_ON_CLOSE);
        frame.setVisible(true);
//Creating sample content
        JButton click = new JButton("click!");

        JTextField content = new JTextField (30);
        content.setText(" < -------------This is some content -------------- > ");
//frame. getContentPane () returns the underlying ContentPane
        JPanel panel = (JPanel)frame.getContentPane();
        panel.setLayout(new BorderLayout());
        panel.add(content,BorderLayout.CENTER);

//frame. getGlassPane () returns the underlying GlassPane

        JPanel glass = (JPanel)frame.getGlassPane();

       glass.setVisible(true);
       glass.setLayout(new BorderLayout());
       glass.add(click, BorderLayout.SOUTH);

       click.addActionListener(e -> {
                  if(panel.isVisible())
                  {
                          panel.setVisible(false);
                  }
                   else
                 {
                          panel.setVisible(true);
                 }
      });

  }

}
————————————————————————–
Explanation of the Program
Let us now analyze the above code!
In the main function, we create a JFrame object called frame. Next, we give it a FlowLayout and set the size to 400×200.
The method setLocationRelativeTo(null) ensures that the frame opens in the center of the screen.
Now it is interesting to note that function of the close button on the frame is not defined by default. Therefore, we use the
.setDefaultCloseOperation(JFrame.EXIT_ON_CLOSE) method which enables us to use that close button. In the following step, we make the frame visible.
We now create a JButton object called click, a JTextField object called content.
Now, comes the exciting part!
We obtain the ContentPane of the frame and type-cast it into a JPanel object called panel using (JPanel)frame.getContentPane() method. Thereafter, the panel is given a BorderLayout and content is added to its center. In the next step, we obtain the GlassPane of the frame and cast it into a JPanel object called glass using the method (JPanel)frame.getGlassPane(). After doing this, we give glass a BorderLayout, make it visible and add click (the JButton object we created earlier) to the south of the glass. Next, add an action listener to the button which will toggle the visibility of the ContentPane.
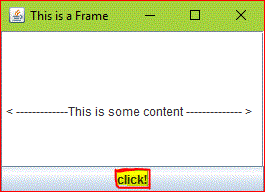
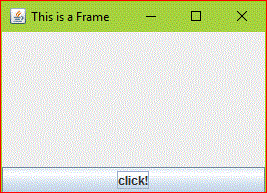
As we can see in the figures below, clicking on the button changes the visibility of the ContentPane.
Note that the button on the glass pane stays unaffected here.
Output of the above code

After the button is clicked.

This was JRootPane.
In case you have any questions, please write them in the comments. We will try to answer them as soon as possible!
Like / Comment / Spread / Subscribe.

thank you …
LikeLiked by 1 person
Thank you for appreciating!
LikeLike
Thanks
LikeLiked by 1 person
Thank you so much for your response!
LikeLike
Thank you so much!
LikeLiked by 1 person
Hello Bojana, thank you so much for your response. Would love to hear some suggestions about the topics that I should cover up in my blog.
With Regards,
Sandeep Dass
LikeLike
Good job… Akhil 👌👌👌
LikeLiked by 1 person
Appreciated!
LikeLiked by 1 person